• LVM (Logical Volume Manager) is the ever-present disk and volume management framework for AIX. The level of integration is visible not only in fileystem commands that understand the underlying LVM, but in other, higher level, commands like the install and backup utilities that can optionally grow filesytems when necessary.
• Physical disks (hdisks) are placed under LVM control by adding them to a VG (volume group). Within LVM, these disks are referred to as PVs (Physical Volumes).
• Each PV in a VG contains a unique ID called a PVID. The PVID of a disk is used to track all disks in a VG, but also provides a device name independence that makes importing, exporting, and disk management much simpler. Because the unique characteristics of the disk become the identifier, the device name remains consistent but does not need to as (properly) renaming / reordering disks under LVM control is of little consequence.
• Once a hdisk is placed into a VG it is divided into PP (Physical Partitions). PPs are then used to create LVs (Logical Volumes). An additional layer of abstraction is placed between an LV and a PP called a LP (Logical Partition) that allows for more than one PP to be used (i.e. mirrored) to back each portion of a LV.
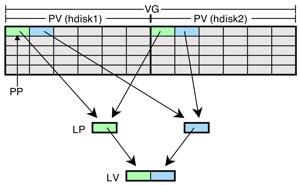
A simplistic logical view of two PVs in a VG providing mirrored PPs for a LV.
• Several on-disk structures are responsible for holding all LVM information. The VGDA resides on each disk and holds structural information such as the member PVs. The VGSA also resides on each disk and contains status information on all member devices. The LVCB varies by VG type but traditionally has resided in the first part of an LV (when it exists as a separate structure). In addition to the basic LVM commands that manage these structures, there are a number of lower level LVM commands that accesses this metadata more directly.
• The first disk in a VG will have two copies of the VGDA, and a two disk VG will have one disk with a single VGDA and the other with two copies. For three disk and larger VGs, each disk has a single copy of the VGDA.
• The concept of quorum is achieved when > 50% of the copies of the VGSA/VGDAs are online. If quorum is lost then the VG can be taken offline.
• Quorum is problematic for two disk VGs because the loss of the two VGDA disk means a loss of the entire VG. In a mirrored configuration (a typical case for two-disk VGs) it is inappropriate to offline the VG for a single disk failure. For this reason, quorum rules can be turned off in the case of a two disk mirrored VG.
• The ODM is central to managing off-disk LVM structures and physical device to hdisk mappings. When a VG is created or imported this information is added to the ODM as well as other system files such as /etc/filesystems.
• AIX LVM supports several versions of VGs that have been introduced over the lifetime of the product. The VG types are normal, big, and scalable. Normal VGs were the original creation and are more limited than the big or scalable types. The easiest way to tell the type of an existing VG is to look at the Max PV value for the VG (see example in the next section).
| VG Type | mkvg option |
Max PV |
Max LV |
Max PP |
Notes |
| Legacy | 32 | 256 | 3512 | Can be converted to Big VG | |
| Big | -B | 128 | 512 | 130048 | LVCB data is stored in the head of the data area in the LV |
| Scalable | -S | 1024 | 4096 | 2097152 | Default LV and PP values are lower and can be increased to shown maximums |
• The default filesystem on AIX is JFS2. JFS2, and it predecessor JFS, are both journaling filesystems that utilize the fundamental Unix filesystem structures such as i-nodes, directory structures, and block allocations. (Technically, JFS2 allocates blocks in groups called "extents".)
• JFS2 is not an implementation of UFS and expands considerably over basic filesystem features with such capabilities as snapshots, dynamic i-node allocation, online growth, extended attributes, and encryption. AIX provides a layer of abstraction over all supported filesystems that map filesystem specific structures to standard Unix filesystem tools so that filesystems like JFS2 appear as an implementation of UFS.
• While most journaled Unix filesystem implementations use inline logs (within the filesystem structure), AIX tends to use a special type of LV that is created only to contain log data. The jfs(2)log LV can provide logging capability for more than one filesystem LV. The log type must match the filesystem type. JFS2 can log to an inline log, but these implementations tend to be the exception to the rule.
• The default filesystems that are installed with AIX:
| hd1 | /home | |
| hd2 | /usr | |
| hd3 | /tmp | |
| hd4 | / | root |
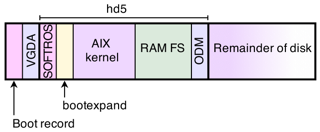
| hd5 | BLV (Boot Logical Volume) | |
| hd6 | Paging space | |
| hd8 | JFS2 log | |
| hd9var | /var | |
| hd10opt | /opt | |
| hd11admin | /admin | New in 6.1 |
| livedump | /var/adm/ras/livedump | New in 6.1 TL3 |
| /proc | procfs pseudo filesystem |